
The IP address is applied for verities of reasons. The IP address is mainly necessary to log in to the router; the username and Password are also needed with the IP address for login to the router. The IP address 192.168.1.1 is a Private IP address, which is related to the Linksys router. Several networking devices use separate private IP addresses. But, the public IP address is used on the website.
The IP address is 192.168.1.1 Login to a default IP address for the Linksys routers.
To set up anything in the router, you want to log in to the router & use the IP address is 192.168.1.1 on the browser adders field and Tap on the browser’s Go button. Presently the login screen page will appear, and there you require to use default username and Password.
You will see the log in detail in the router box. Now, Check the router backside to know the IP address, username, and Password. You may make those detail on a paper sheet.
The IP Address is 192.168.1.1 Login Page, Username & Password
Suppose you want to secure the router, then you need to change the default username and Password. If you to use the default username and password on the device, it is straightforward to log into the router by anyone. This is why it is essential to change the default login detail. Now, If you change the default username and password, then no one can access your router from your home or office. Soon your router is secured enough. If you need to remove the settings, then you can press a reset button.
Instantly, setup the internet is elementary on the router. You have to apply your ISP information to set up an internet connection. Your ISP needs to give all the necessary data for setup internet. If you need to set up the internet of a dial-up connection, you have to use a username and Password in a dial-up router. This is better to use the Wizard tool for a quick setup of an internet connection in the router. Well, Advanced users can set up an internet connection manually.
You can customize Router Settings utilizing Router Admin Page. Also, You can change Router Login IP from Network Settings.
There are many types of settings available in the router control center for WiFi security. Changing the default SSID network name is the main thing, which is mainly utilized to identify the network connection. To the protection of the WiFi, you should give a different name to the SSID network name. You should not do family members’ name as the SSID network name. Therefore, people cannot identify your WiFi connection until you disclose it, and the relationship remains safe. You should protect the SSID network name if your router supports that. By covering the SSID network name, you will get more security. Read the router manual to know the detailed method of protecting the SSID network name. Generally, it’s a company name or brand name of your router utilizing which you will login to 192.168.1.1 IP.
Note: the default username and Password for General IP 192.168.1.1 routers are:
- Username: Admin.
- Password: Admin.
Or This
- Username: Admin.
- Password: Password.
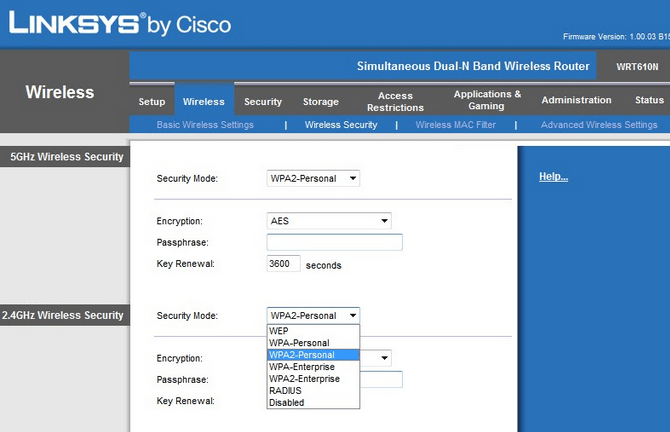
The Encrypted security is not a new thing, and the developer always updates the feature for better security. This Encrypted security is WPA2 and PSK. These are running mostly on all of the devices now a day. You should allow WPA2 and PSK for WiFi security. Accordingly, You should use updated encrypted security always. You want to apply a hard password for WPA2 and PSK encrypted security to make the WiFi safer. Read the router’s manual to know more further about the guard if you want to understand all the features of encrypted security.
To the WiFi connection, you should use a hard password. You want to use a critical password for the WiFi connection safer. This hard Password for WiFi is significant. You can utilize a tool for creating a password. You can make a difficult password for the WiFi connection. \
You can build the Password by yourself with letters, numbers, and symbols combination. To building a hard password, you need to use upper and small case letters in the Password. The Password will be 11 figures long, at least.
Mac filtering is a primary option for filtering the MAC ID for the router. With the feature, you can build a safe list of devices authorized to use a WiFi connection. You can add & remove MAC ID anytime from the menu. Now, You should update the firmware for making the secure connection and the device.
How to Find Router IP Address
If you desire to set up a new Router or configure your Network, you will need a Router IP Address to access it & log in to your router to change settings. Presently how to find Router IP address to log in. Here are amazing default IP addresses 192.168.0.1, 10.0.0.0.1 or 192.168.2.1. Check the following links to find more Router IP addresses.
How to Change 192.16811 Router Password
Suppose you want to change Router Password, then you can. All you need to take is access Router admin page > go to advanced settings > Router Admin > Change Password> So, Enter Old and New Password and save. Finished!
You can now log in to your router with their default IP address but note that each router has its Default IP address. Yet, here we are going to share a list of all the 192.168.1. Router IP address & default username and Password.
Router IP address, Default Username, and Password:
| Router Manufacturer | IP address | User Name | Password |
|---|---|---|---|
| TP-Link | 192.168.1.1 192.168.1.254 |
admin | admin/password |
| Cisco | 192.168.1.1 | admin | admin |
| D-link | 192.168.1.1 192.168.1.254 |
admin | admin |
| Linksys | 192.168.1.1 192.168.1.10 192.168.1.254 192.168.2.1 |
admin | admin |
| Netgear | 192.168.1.1 | admin | admin |
| Netgear | 192.168.1.1 | admin | password |
| Asus | 192.168.1.1 192.168.2.1 10.10.1.1 |
admin | admin |
| Belkin | 192.168.1.1 192.168.2.1 10.0.0.2 10.1.1.1 |
(none) | MiniAP |
| Billion | 192.168.1.254 | admin | admin |
How to Access the Cisco Router using this 192.168.1.1?
Step 1: Firstly, Connect your Cisco Router to PC using RJ45 cable.
Step 2: Well, Turn on the Router and PC.
Step 3: Open Browser & type 192.168.1.1 and press Enter.
Step 4: Here, Enter the Default Username and Password (admin-admin) if you haven’t changed. Or Enter your username & Password.

Step 5: That will open the Cisco Router Admin Page. Here, you can customize all your settings and change the WiFi password.
192.168.1.1 IP address is assigned to each device in a network that allows you to communicate with the tools. This private IP address ranges from 192.168.0.1 to this 192.168.1.255.
D-link Router Login
Step 1: Plug D-Link router with your desktop or laptop with an Ethernet cable.
Step 2: Turn on your PC/Computer.
Step 3: Now, Open a Web browser. Type this http://192.168.1.1 or this http://dlinkrouter > Enter.
Step 4: Now, Log in to the D-Link router with the administrator username & Password.
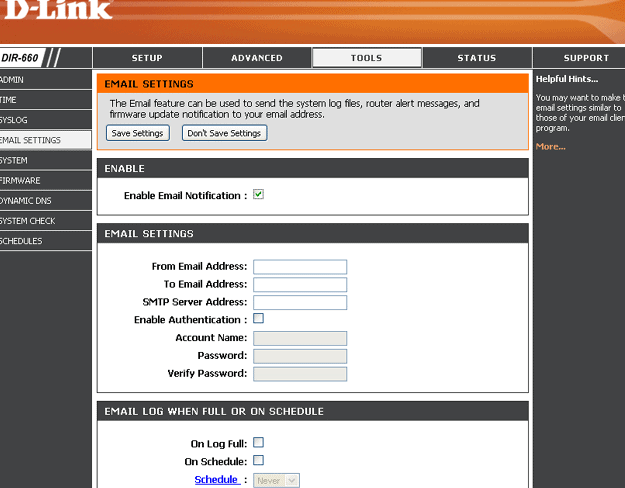

Step 5: So, If you are Login into for the first time, click on setup and then go to wireless settings. You can set it up with manually or automatically.
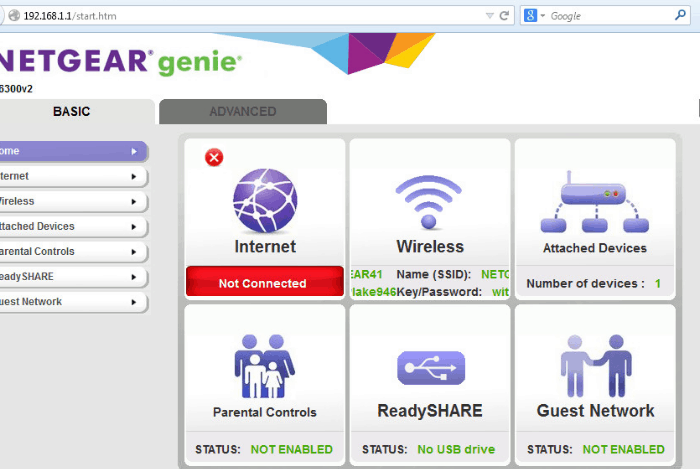
How to Log Into a Netgear Router?
Step 1: First, connect the Netgear router with your Windows PC and & then open a browser and type 192.168.1.1 > Enter.
Step 2: Now, Enter the Router’s default username & Password. If you don’t know the default username/password, then check our above table. Move to Wireless Settings and customize settings.

TP-LINK Router, Login & IP
Step 1: TP-LINK Router should an IP address 192.168.1.1. Connect Router & PC with the RJ45 cable.
Step 2: Now, Type 192.168.1.1 in browser > Enter.
Step 3: Here, Enter the username and Password.
- IP address:- 192.168.1.1 (or http://tplinkwifi.net)
- Username:– admin
- Password:- admin/password
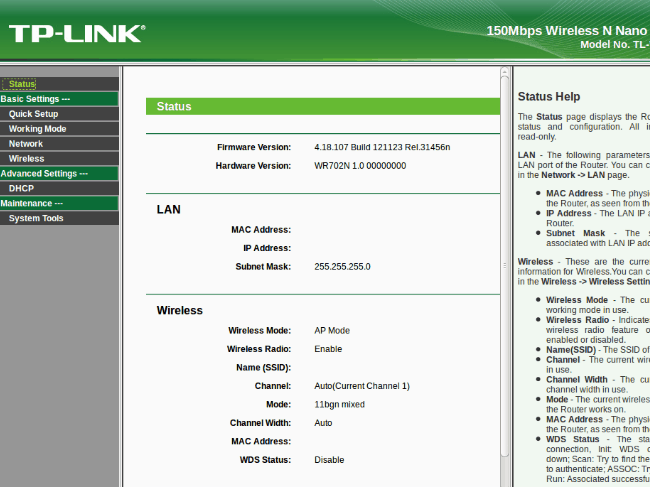

Step 4: Here, Go to Wireless Setting & change settings that you want.
If you encounter issues while connecting the router and accessing 192.168.1.1 admin page, you may have done something wrong. These are some possible errors.
- The IP address is misconfigured.
- One Incorrect IP address is used in the browser, or wrong settings are set up.
- This router may not reply to the damaged connection with the modem.
- One wrong proxy is installed in the browser. Now reconfigure the proxy properly.
- This wrong or faulty formed IP address is used like 192.168.I.I instead of 192.168.1.1.
- So, The IP address is used as link www.192.168.1.1
See the manual to know about the WiFi and router settings. You can now contact the manufacturer site to know about the parameters or ask for help from the router manufacturer. Here is a speedy and easy process to know everything about the routers and WiFi setting.
How to Connect 2 Routers having the same IP Address?
Step 1: First, Connet one of the Router with PC utilizing LAN cable and then go to https://192.168.0.1 or this www.192.168.1.1 address > Enter username and password > Access Admin page.
Step 2: Now, Go to Network or LAN Setup & change the IP address to 192.168.2.1 and save.
So, In my case, I am using NetGear Router, then go to Advanced > Setup > LAN Setup an IP address > change IP & Apply.
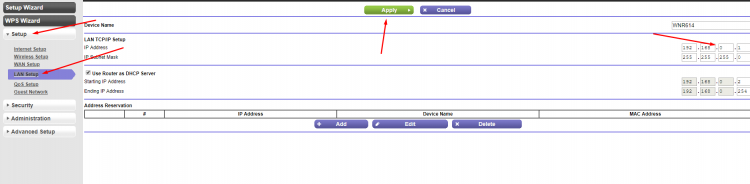

Step 3: Instantly, Connect both the Router with LAN cable, and you will see they are working excellent.
Remarkable new Routers have auto setup mode. They enable users to configure it, just if the user doesn’t want to set up a new Router, they automatically set it up. They see Default Router Login IP address and Password for you.
If you are quiet facing issues while accessing 192.168.1.1 admin Login page, then comment box below.